A renovation failure rarely begins with a catastrophe. More often, one small check was skipped: nobody drew the door swing, the countertop was ordered before the cabinets were fixed in place, or the light was centered without accounting for the ceiling medallion. On paper, the difference is a few inches. In the finished room, it becomes a door that will not open, an awkward kitchen, or a second bill for doing the work again.
Some of these scenes are funny, but every one contains a useful lesson. Here is where the decision went wrong, which problems can be corrected without starting over, and when a cosmetic patch merely hides a planning failure.
About the images
To illustrate each situation clearly without republishing viral photographs, The LINES recreated the mistakes as original photorealistic visualizations. They do not show identifiable homes; they demonstrate real planning and installation problems.
Four checks before installation begins
- Draw everything that moves Show doors, cabinet fronts, drawers, windows, and appliance doors in their open positions.
- Build a full-size mock-up Painter’s tape or cardboard can mark the actual footprint of fixtures, furniture, and appliances.
- Confirm the sequence Take final measurements only after the surfaces and bases that determine them are in their finished positions.
- Pause before the irreversible step Before drilling, cutting, or bonding, recheck the centerline, level, clearances, and service access.
1. The countertop corner that never met

The material is not the real problem here; the measurement is. Walls rarely meet at a perfect right angle, and installed cabinets may sit a few millimetres out of line. If two rigid pieces are fabricated from approximate dimensions, they cannot simply be pulled together afterward.
A thick bead of sealant or a decorative strip will not make this joint convincing. It remains visible and may trap water and dirt. A specialist must assess the exact installation, but remaking one section is often the honest solution.
Prevent it: make the final template after the base cabinets are level and secured, measure the actual wall angle, and approve the joint location before the material is cut.
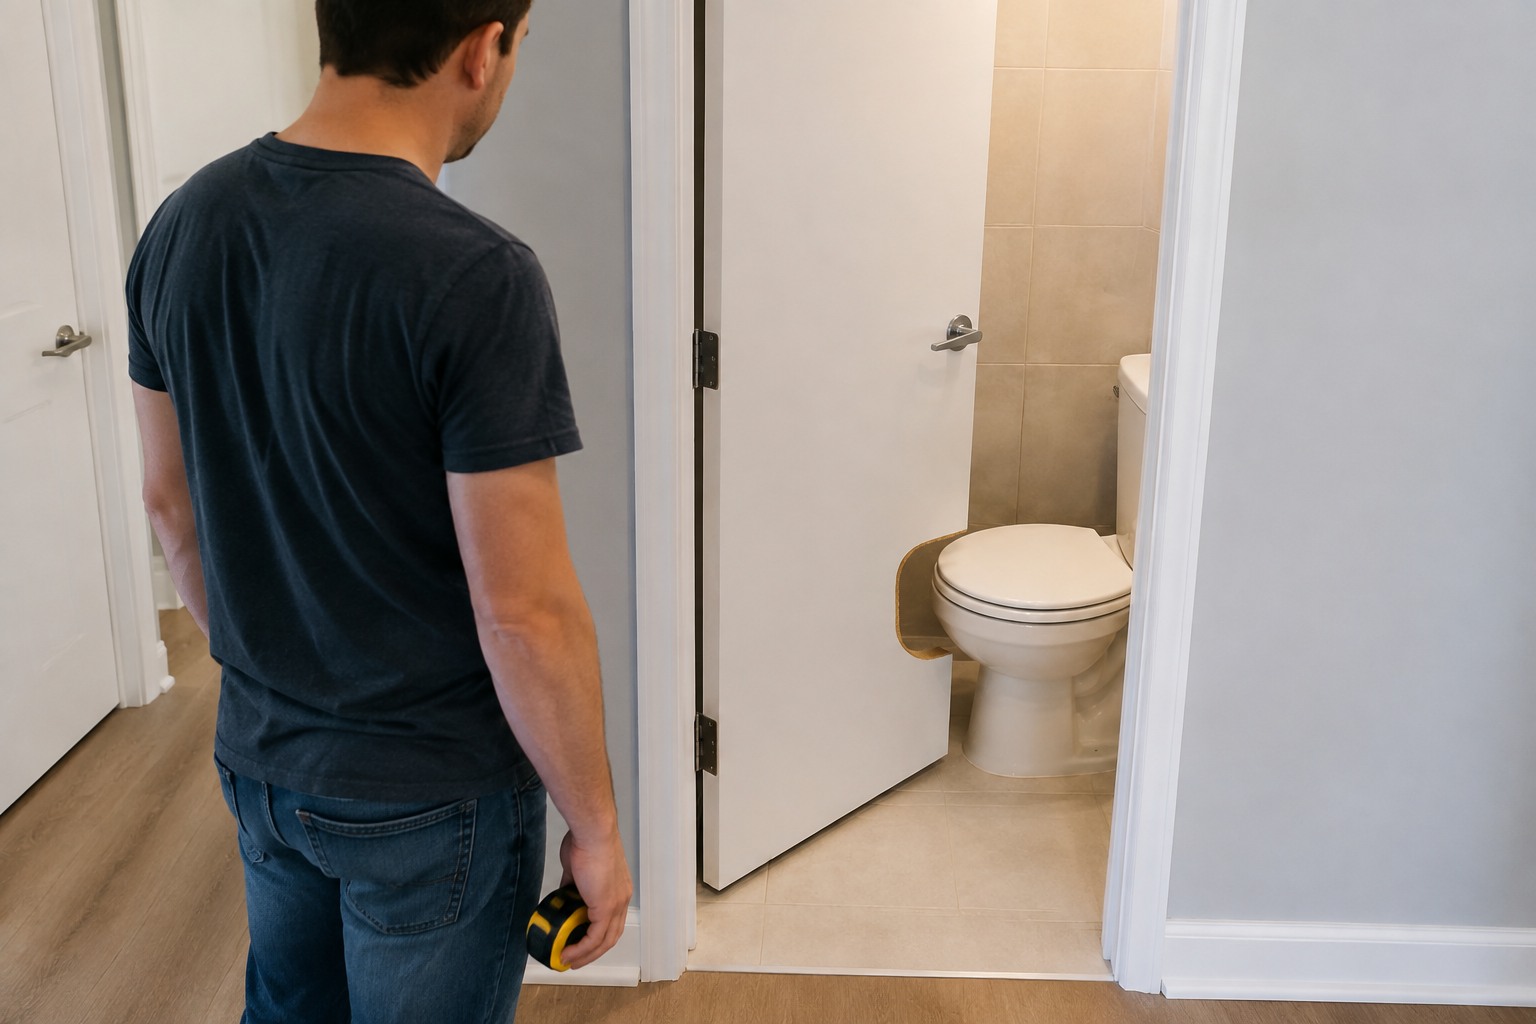
2. The bathroom door opens as far as the toilet

The toilet and the door may each have fitted on the drawing. The conflict appeared because nobody tested them at the same time: the door’s swing arc crosses the fixture.
Instead of changing the layout, someone cut a notch into the door to fit around the toilet. The door can now open, but this “solution” spoils its appearance, weakens the panel, and does not address the real problem: the bathroom was planned without accounting for the door’s movement.
Changing the swing direction or choosing another type of door may solve the problem if the hallway allows it. Moving the toilet is much more invasive because it may require changes to the waste connection, floor, and finishes.
Prevent it: draw the full movement of the door, including the handle, and combine it with the fixture projection and the space a person needs to enter.
3. A radiator with nowhere to breathe

The radiator proved too tall for the chosen section of wall. Instead of selecting another model or location, it was mounted at an angle, with the brackets and pipes adapted to fit.
The heating unit may still work, but the installation looks like an obvious mistake and makes servicing more difficult.
Prevent it: choose the emitter after the room plan is settled, then check the manufacturer’s installation clearances and valve access as carefully as its width and height.
4. The pendant and ceiling medallion part ways

The medallion was positioned according to the room geometry, while the electrical point remained where it had been before. Both decisions may have seemed reasonable in isolation; together they create a mistake visible from the doorway.
A looping cord can disguise the offset, but rarely resolves it elegantly. A clean correction usually involves relocating the connection and repairing the ceiling, which should be handled by a qualified electrician.
Prevent it: before finishing the ceiling, place the light center, medallion, mouldings, furniture, and actual electrical point on the same drawing.
5. Everything fits, but nobody does

This bathroom contains every required fixture, yet leaves almost no space for the person using it. Knees meet the basin, plumbing is difficult to reach, and cleaning the floor becomes its own project.
A compact hand basin, shorter-projection toilet, wall-hung fixture, or differently shaped shower may help.
Prevent it: mark every fixture on the floor, then add room for the user, door movement, and access to the trap, cistern, and shutoff valves.
6. The cooktop trapped in a corner

The corner looked like unused counter space, but the installed cooktop puts some burners close to the walls, provides almost no landing space, and sits only partly beneath the hood. The nearby sink adds another conflict between splashing water and hot cookware.
There is no single clearance number that applies to every kitchen. Acceptable distances depend on the appliances, surrounding materials, and the homeowner’s requirements.
Prevent it: position full-size appliance footprints, required clearances, and useful counter space before ordering cabinets or cutting the worktop.
7. One latch, ten attempts

Every new attempt made this repair more visible. The bolt and keeper were not aligned, holes were drilled without a reliable mark, and the damaged timber now holds the next screws less securely.
If the door remains sound, a repairer may remove the hardware, rebuild and refinish the area, then install the latch correctly. When a thin edge is badly split or the fixings land in a void, replacing a component or the door may be more sensible.
Prevent it: close the door, position both latch parts together, check level, drill fine pilot holes, and test the movement before fully tightening the screws.
8. Pipework assembled like a puzzle

The system may even work. But numerous short sections and fittings where a cleaner route was possible add potential trouble spots and make the edge of the room difficult to clean.
Hiding every pipe is not automatically better: connections that require inspection must remain accessible. The goal is a short, understandable route with suitable supports and clean transitions—not invisibility at any cost.
Prevent it: agree on the service route before skirting and final finishes are installed, and dry-fit complicated corners before anything is permanently fixed.
9. The shower enclosure on stilts

A high tray often appears when the waste connection was left too high or the drainage route was not coordinated. Raising the enclosure makes the trap connect, but creates an awkward step, an exposed base, and an unfinished-looking installation.
Covering the legs with an arbitrary panel is not enough. The base must be stable, loads must be supported as the manufacturer intended, wet junctions must be properly detailed, and the trap still needs service access.
Prevent it: coordinate the finished floor height, waste position, tray model, and access method before tiling begins.
10. Decor nobody tested in context

The last mistake breaks nothing, but it explains why decor cannot be selected independently of the objects in front of it. The portrait looked dramatic on a screen; once the sink was installed, the spout and handles became unintended parts of the composition.
Unlike a countertop or waste pipe, this is relatively easy to correct: replace the panel, move the crop, or choose an abstract image. It would have been even easier to test the artwork from the viewer’s actual position.
Prevent it: print a scaled draft, mount it temporarily, and inspect it after the furniture, mirror, outlets, and plumbing fixtures are in place.
The cheapest phase of a renovation is the check
Most of these mistakes did not require sophisticated software to discover. A plan with open doors, a cardboard mock-up, or one final measurement before cutting and drilling would have exposed them.
Before final installation, walk through the room as if it were finished: open every door and drawer, stand at the basin, reach a valve, place a pan beside the cooktop, and imagine cleaning the floor. A beautiful renovation starts before the color scheme—when ordinary actions stop colliding with one another.