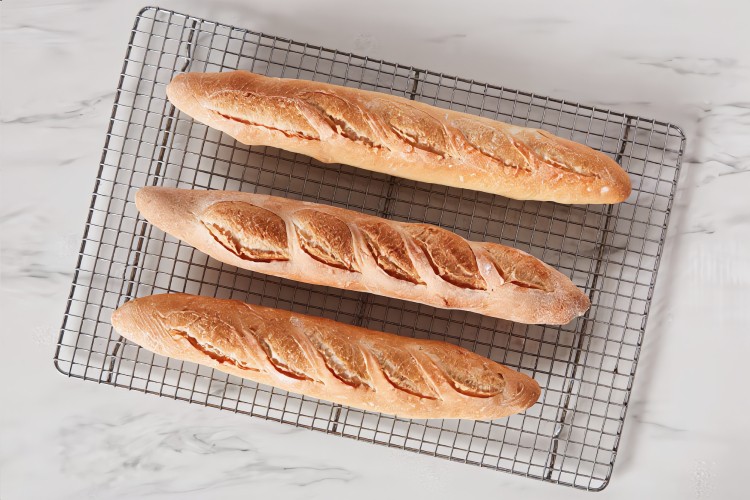
A first homemade baguette often resembles a very good long sandwich loaf: the flavor is pleasant, but the scores fade, the crust softens quickly, and the crumb is unusually even. The flour is not always to blame. Baguettes are shaped by several small decisions — when to end fermentation, how much gas to preserve, how firmly to close the seam, and when the loaves are ready for the oven.
In this method, the baguettes proof between folds of sturdy cloth and bake on an inverted sheet pan, baking stone, or steel. No specialty baguette pan is required.
- Yield
3 baguettes - Active time
about 40 minutes - Total time
about 15–20 hours - Bake
24–28 minutes at 450°F / 230°C
This recipe uses a liquid preferment made with flour, water, and a small amount of commercial yeast. It matures overnight and all of it goes into the final dough. A sourdough starter cultivates wild yeast over several days and requires regular feedings. If that is what you are looking for, use The LINES' separate guide to making a sourdough starter from scratch.
Ingredients
Ingredients are calculated for 3 baguettes.
Poolish
- 120 g unbleached all-purpose flour
- 113 g cool water
- a very small pinch instant or active dry yeast, about 1/16 tsp for the base batch
Final dough
- all of the mature poolish
- 420 g unbleached all-purpose flour
- 255 g lukewarm water
- 1 1/2 tsp instant or active dry yeast
- 12 g fine salt
For the poolish, use only a few grains of yeast for one or two baguettes, a tiny pinch for three or four, and about 1/8 tsp for six. If every loaf will not fit at once, keep the second batch in a cool place while the first one bakes.
Flour around 11–12.5% protein is a useful starting point. Very strong bread flour may ask for a little more water and produces a chewier crumb; softer flour spreads more readily. When trying an unfamiliar brand, hold back 15 g of the water and add it near the end of mixing only if the dough feels firm.
Allergen: wheat and gluten.
Day 1: make the poolish
In the evening, stir together the poolish flour, cool water, and yeast until evenly combined. Cover and leave at room temperature for 12–16 hours. In a warm kitchen, begin checking it earlier.
How to know the poolish is ready
By morning it should have expanded, be webbed with bubbles, and have a gently domed or just-flattened top. The aroma is mild and yeasty rather than sharply sour. A deep crater means it has moved past its peak. It can still be used, but the final dough may rise more slowly.
Day 2: mix the final dough
Loosen the mature poolish with the final-dough water. Add the flour, yeast, and salt, mix until no dry patches remain, and rest for 10 minutes.
Knead with a dough hook for about 4 minutes on medium-low, or by hand for 8–10 minutes. The dough does not need to become a glossy, tight ball. It should hold together, stretch before tearing, and remain slightly tacky. Adding handfuls of flour simply to keep your fingers dry produces a tighter crumb.
Bulk fermentation and one fold
Transfer the dough to a lightly greased bowl, cover, and rest for 45 minutes. Pull four sides toward the center, turn the dough seam-side down, and leave it for another 45 minutes.
By the end, it should look aerated and expand to roughly one and a half times its original size. It does not need to double.
Divide and give the dough a short rest
Turn the dough onto a barely greased surface and divide it into 3 equal pieces of about 10 3/4 ounces / 305 g. Gather each piece into a short, thick cylinder, cover, and rest for 15–20 minutes.
This pause relaxes the gluten. If a piece snaps back as you lengthen it, give it another five minutes rather than rolling harder.
If your baking surface is shorter than 15 inches / 38 cm, leave the calculator at the base three-loaf batch but divide the dough into six pieces of about 5 1/3 ounces / 150 g. Begin checking them at 18 minutes.
Final shaping
- Set one piece seam-side up and gently pat it into a small rectangle without pressing out every bubble.
- Fold the top third toward the center and seal the fold with the heel of your hand.
- Fold the lower third toward the center, seal again, then fold the dough lengthwise.
- Close the long seam firmly; it helps the loaf stay round rather than spreading flat.
- Beginning at the center, roll your palms toward the ends. Lengthen gradually and taper the tips with the final passes.
Final proof
Rub a sturdy lint-free cotton or linen towel generously with flour. Arrange the loaves seam-side up with tall folds of cloth between them to support their sides, then cover with another towel.
Proof for about 45–60 minutes and begin preheating the oven at the same time. A ready baguette looks clearly fuller but has not doubled. A very light fingertip indentation returns slowly and does not disappear completely. If it springs back at once, wait another 10 minutes; if the loaf begins to sag, bake without delay.
If you would rather avoid transferring proofed loaves from cloth, use The LINES' separate guide to baking with a perforated baguette pan.
Prepare the oven and choose a steam method
Preheat to 450°F / 230°C for at least 30 minutes. A stone or steel delivers stronger bottom heat, but a heavy inverted sheet pan works too. Set parchment on a board or rimless sheet that can act as a loading peel.
Choose one steam method:
Once the bread is loaded, cover the baguettes for the first 10–12 minutes with a large oven-safe metal roasting pan with no plastic parts. Moisture released by the dough stays close to the loaves.
Preheat a sturdy metal pan or cast-iron skillet on the bottom rack. Once the baguettes are loaded, add about 1/2 cup / 120 ml boiling water and close the door. Do not use glass or pour water directly onto the oven floor.
If the oven manual advises against added steam, mist the loaf surfaces well immediately before baking. The crust may be a little less glossy, but the recipe still works.
Transfer, score, and bake
Roll the baguettes from the cloth onto the parchment one at a time so the seam lands underneath. A slight curve matters less than repeated handling that presses gas from the dough.
With a sharp lame or razor, make three to five cuts that run almost along the baguette. Hold the blade at roughly a 30–45° angle to the surface and begin each cut slightly above the end of the previous one. Crosswise stripes may look decorative, but they do not guide expansion as evenly.
Bake for 24–28 minutes, until the crust is a rich golden brown. If you used a metal cover, remove it after the first 10–12 minutes.
Move the bread straight to a rack and wait at least 40 minutes before cutting. Steam is still moving through the loaf, and the crumb is finishing its structure.
What went wrong — and what to change next time
How to use this guide: select a problem or its arrow to reveal the likely causes and the most useful adjustment.
The baguettes spread sideways
The long seam may have been weak, the cloth may not have supported the sides, or the dough may have overproofed. Very soft flour or too much water can contribute as well.
Next time, seal the seam firmly and make taller cloth folds between the loaves. Bake while a fingertip mark still returns slowly and the dough can hold its shape. If it spreads even after folding, hold back 10–15 g of water in the next batch.
The crumb is tight and evenly aerated
This often follows excess flour, short fermentation, or aggressive pressing during shaping. The poolish may also have been used before it was fully aerated.
Keep the dough soft and slightly tacky, wait for a bubbly poolish and visible expansion after the fold, and shape with your palms rather than a rolling pin. Do not expel every bubble simply to make the loaf perfectly even.
The scores barely opened
A dull blade, shallow or crosswise cuts, a dry surface, or overproofing can all flatten the score pattern. Once a loaf has lost its resilience, it has little oven spring left.
Cut quickly, almost along the baguette, with each score slightly overlapping the previous one. Avoid sawing through the same line twice and keep the dough covered until baking so the surface does not dry out.
The crisp crust softened quickly
The loaf may be underbaked, may have cooled on the hot sheet pan, or may have been bagged while steam was still escaping. Even a well-baked crust naturally softens in a humid kitchen.
Bake to a rich color, move the bread directly to a rack, and never wrap it while warm. The next day, refresh it for 5–7 minutes at 400°F / 200°C, then leave it on a rack for a few minutes.
Storage
Baguettes are at their best on the day they are baked. Keep one overnight in a paper bag or clean towel. For longer storage, freeze fully cooled loaves whole or in portions, then reheat after thawing.
Sources
The poolish and final-dough formula is based on King Arthur Baking's Classic Baguettes. The LINES adds a chronological home process, a yield calculator, visual fermentation cues, unsupported shaping, two steam options, and result-based troubleshooting.